What is the relationship between an ISU (Integration System User) and an ISSG (Integration System Security Group)?
The ISU is a member of the ISSG.
The ISU owns the ISSG.
The ISU grants security policies to the ISSG.
The ISU controls what accounts are in the ISSG.
The Answer Is:
AExplanation:
This question explores the relationship between an Integration System User (ISU) and an Integration System Security Group (ISSG) in Workday Pro Integrations, focusing on how security is structured for integrations. Let’s analyze the relationship and evaluate each option to determine the correct answer.
Understanding ISU and ISSG in Workday
Integration System User (ISU): An ISU is a dedicated user account in Workday specifically designed for integrations. It acts as a " robot account " or service account, used by integration systems to interact with Workday via APIs, web services, or other integration mechanisms (e.g., EIBs, Core Connectors). ISUs are typically configured with a username, password, and specific security settings, such as disabling UI sessions and setting session timeouts to prevent expiration (commonly set to 0 minutes). ISUs are not human users but are instead programmatic accounts for automated processes.
Integration System Security Group (ISSG): An ISSG is a security container or group in Workday that defines the permissions and access rights for integration systems. ISSGs are used to manage what data and functionalities an integration (or its associated ISU) can access or modify within Workday. There are two types of ISSGs:
Unconstrained: Allows access to all data instances secured by the group.
Constrained: Limits access to a subset of data instances based on context (e.g., specific segments or data scopes).ISSGs are configured with domain security policies, granting permissions like " Get " (read), " Put " (write), " View, " or " Modify " for specific domains (e.g., Worker Data, Integration Build).
Relationship Between ISU and ISSG: In Workday, security for integrations is managed through a hierarchical structure. An ISU is associated with or assigned to an ISSG to inherit its permissions. The ISSG acts as the security policy container, defining what the ISU can do, while the ISU is the account executing those actions. This relationship ensures that integrations have controlled, audited access to Workday data and functions, adhering to the principle of least privilege.
Evaluating Each Option
Let’s assess each option based on Workday’s security model for integrations:
Option A: The ISU is a member of the ISSG.
Analysis: This is correct. In Workday, an ISU is assigned to or associated with an ISSG to gain the necessary permissions. The ISSG serves as a security group that contains one or more ISUs, granting them access to specific domains and functionalities. For example, when creating an ISU, you use the " Create Integration System User " task, and then assign it to an ISSG via the " Assign Integration System Security Groups " or " Maintain Permissions for Security Group " tasks. Multiple ISUs can belong to the same ISSG, inheriting its permissions. This aligns with Workday’s security framework, where security groups (like ISSGs) manage user (or ISU) access.
Why It Fits: The ISU is a " member " of the ISSG in the sense that it is linked to the group to receive its permissions, enabling secure integration operations. This is a standard practice for managing integration security in Workday.
Option B: The ISU owns the ISSG.
Analysis: This is incorrect. In Workday, ISUs do not " own " ISSGs. Ownership or control of security groups is not a concept applicable to ISUs, which are service accounts for integrations, not administrative entities with authority over security structures. ISSGs are created and managed by Workday administrators or security professionals using tasks like " Create Security Group " and " Maintain Permissions for Security Group. " The ISU is simply a user account assigned to the ISSG, not its owner or controller.
Why It Doesn’t Fit: Ownership implies administrative control, which ISUs lack; they are designed for execution, not management of security groups.
Option C: The ISU grants security policies to the ISSG.
Analysis: This is incorrect. ISUs do not have the authority to grant or modify security policies for ISSGs. Security policies are defined and assigned to ISSGs by Workday administrators or security roles with appropriate permissions (e.g., Security Configuration domain access). ISUs are passive accounts that execute integrations based on the permissions granted by the ISSG they are assigned to. Granting permissions is an administrative function, not an ISU capability.
Why It Doesn’t Fit: ISUs are integration accounts, not security administrators, so they cannot modify or grant policies to ISSGs.
Option D: The ISU controls what accounts are in the ISSG.
Analysis: This is incorrect. ISUs do not control membership or configuration of ISSGs. Adding or removing accounts (including other ISUs) from an ISSG is an administrative task performed by users with security configuration permissions, using tasks like " Maintain Permissions for Security Group. " ISUs are limited to executing integration tasks based on their assigned ISSG permissions, not managing group membership.
Why It Doesn’t Fit: ISUs lack the authority to manage ISSG membership or structure, as they are not administrative accounts but integration-specific service accounts.
Final Verification
Based on Workday’s security model, the correct relationship is that an ISU is a member of an ISSG, inheriting its permissions to perform integration tasks. This is consistent with the principle of least privilege, where ISSGs define access, and ISUs execute within those boundaries. The other options misattribute administrative or ownership roles to ISUs, which are not supported by Workday’s design.
Supporting Information
The relationship is grounded in Workday’s integration security practices, including:
Creating an ISU via the " Create Integration System User " task.
Creating an ISSG via the " Create Security Group " task, selecting " Integration System Security Group (Unconstrained) " or " Constrained. "
Assigning the ISU to the ISSG using tasks like " Assign Integration System Security Groups " or " Maintain Permissions for Security Group. "
Configuring domain security policies (e.g., Get, Put) for the ISSG to control ISU access to domains like Worker Data, Integration Build, etc.
Activating security changes via " Activate Pending Security Policy Changes. "
This structure ensures secure, controlled access for integrations, with ISSGs acting as the permission container and ISUs as the executing accounts.
Key References
The explanation aligns with Workday Pro Integrations documentation and best practices, including:
Integration security overviews and training on Workday Community.
Guides for creating ISUs and ISSGs in implementation documentation (e.g., NetIQ, Microsoft Learn, Reco.ai).
Tutorials on configuring domain permissions and security groups for integrations (e.g., ServiceNow, Apideck, Surety Systems).
Refer to the following scenario to answer the question below. Your integration has the following runs in the integration events report (Date format of MM/DD/YYYY):
Run #1
• Core Connector: Worker Integration System was launched on May 15, 2024 at 3:00:00 AM.
• As of Entry Moment: 05/15/2024 3:00:00 AM
• Effective Date: 05/15/2024
• Last Successful As of Entry Moment: 05/01/2024 3:00:00 AM
• Last Successful Effective Date: 05/01/2024
Run #2
• Core Connector: Worker Integration System was launched on May 31, 2024 at 3:00:00 AM.
• As of Entry Moment: 05/31/2024 3:00:00 AM
• Effective Date: 05/31/2024
• Last Successful As of Entry Moment: 05/15/2024 3:00:00 AM
• Last Successful Effective Date: 05/15/2024 On May 13, 2024 Brian Hill receives a salary increase. The new salary amount is set to $90,000.00 with an effective date of April 30,2024. Which of these runs will include Brian Hill ' s compensation change?
Brian Hill will be included in both integration runs.
Brian Hill will only be included in the second integration run.
Brian Hill will only be included in the first integration run.
Brian Hill will be excluded from both integration runs.
The Answer Is:
DExplanation:
The scenario involves a Core Connector: Worker integration with two runs detailed in the integration events report. The goal is to determine whether Brian Hill’s compensation change, effective April 30, 2024, and entered on May 13, 2024, will be included in either of the runs based on their date launch parameters. Let’s analyze each run against the change details to identify the correct answer.
In Workday, the Core Connector: Worker integration in incremental mode (as indicated by the presence of " Last Successful " parameters) processes changes based on the Transaction Log, filtering them by the Entry Moment (when the change was entered) and Effective Date (when the change takes effect). The integration captures changes where:
The Entry Moment falls between the Last Successful As of Entry Moment and the As of Entry Moment, and
The Effective Date falls between the Last Successful Effective Date and the Effective Date.
Brian Hill’s compensation change has:
Entry Moment: 05/13/2024 (time not specified, so we assume it occurs at some point during the day, before or up to 11:59:59 PM).
Effective Date: 04/30/2024.
Analysis of Run #1
Launch Date: 05/15/2024 at 3:00:00 AM
As of Entry Moment: 05/15/2024 3:00:00 AM – The latest point for when changes were entered.
Effective Date: 05/15/2024 – The latest effective date for changes.
Last Successful As of Entry Moment: 05/01/2024 3:00:00 AM – The starting point for entry moments.
Last Successful Effective Date: 05/01/2024 – The starting point for effective dates.
For Run #1 to include Brian’s change:
The Entry Moment (05/13/2024) must be between 05/01/2024 3:00:00 AM and 05/15/2024 3:00:00 AM. Since 05/13/2024 falls within this range (assuming the change was entered before 3:00:00 AM on 05/15/2024, which is reasonable unless specified otherwise), this condition is met.
The Effective Date (04/30/2024) must be between 05/01/2024 (Last Successful Effective Date) and 05/15/2024 (Effective Date). However, 04/30/2024 is before 05/01/2024, so this condition is not met.
Since the effective date of Brian’s change (04/30/2024) precedes the Last Successful Effective Date (05/01/2024), Run #1 will not include this change. In incremental mode, Workday excludes changes with effective dates prior to the last successful effective date, as those are assumed to have been processed in a prior run (before Run #1’s baseline of 05/01/2024).
Analysis of Run #2
Launch Date: 05/31/2024 at 3:00:00 AM
As of Entry Moment: 05/31/2024 3:00:00 AM – The latest point for when changes were entered.
Effective Date: 05/31/2024 – The latest effective date for changes.
Last Successful As of Entry Moment: 05/15/2024 3:00:00 AM – The starting point for entry moments.
Last Successful Effective Date: 05/15/2024 – The starting point for effective dates.
For Run #2 to include Brian’s change:
The Entry Moment (05/13/2024) must be between 05/15/2024 3:00:00 AM and 05/31/2024 3:00:00 AM. However, 05/13/2024 is before 05/15/2024 3:00:00 AM, so this condition is not met.
The Effective Date (04/30/2024) must be between 05/15/2024 (Last Successful Effective Date) and 05/31/2024 (Effective Date). Since 04/30/2024 is before 05/15/2024, this condition is also not met.
In Run #2, the Entry Moment (05/13/2024) precedes the Last Successful As of Entry Moment (05/15/2024 3:00:00 AM), meaning the change was entered before the starting point of this run’s detection window. Additionally, the Effective Date (04/30/2024) is well before the Last Successful Effective Date (05/15/2024). Both filters exclude Brian’s change from Run #2.
Conclusion
Run #1: Excluded because the effective date (04/30/2024) is before the Last Successful Effective Date (05/01/2024).
Run #2: Excluded because the entry moment (05/13/2024) is before the Last Successful As of Entry Moment (05/15/2024 3:00:00 AM) and the effective date (04/30/2024) is before the Last Successful Effective Date (05/15/2024).
Brian Hill’s change would have been processed in an earlier run (prior to May 1, 2024) if the integration was running incrementally before Run #1, as its effective date (04/30/2024) predates both runs’ baselines. Given the parameters provided, neither Run #1 nor Run #2 captures this change, making D. Brian Hill will be excluded from both integration runs the correct answer.
Workday Pro Integrations Study Guide References
Workday Integrations Study Guide: Core Connector: Worker – Section on " Incremental Processing " explains how changes are filtered based on entry moments and effective dates relative to the last successful run.
Workday Integrations Study Guide: Launch Parameters – Details how " Last Successful As of Entry Moment " and " Last Successful Effective Date " define the starting point for detecting new changes, excluding prior transactions.
Workday Integrations Study Guide: Change Detection – Notes that changes with effective dates before the last successful effective date are assumed processed in earlier runs and are skipped in incremental mode.
This is the XML file generated from a Core Connector; Positions integration.

When performing an XSLT Transformation on the Core Connector: Positions XML output file, you want to show a hyperlink of positions that are not available for hiring as an entry in the Message tab.
What are all the needed ETV items to meet the above requirements?


The Answer Is:
BExplanation:
In Workday integrations, the Extension for Transformation and Validation (ETV) framework is used within XSLT transformations to apply validation and formatting rules to XML data, such as the output from a Core Connector (e.g., Positions integration). In this scenario, you need to perform an XSLT transformation on the Core Connector: Positions XML output file to display a hyperlink for positions that are not available for hiring as an entry in the Message tab. This requires configuring ETV attributes to ensure the data is present and correctly targeted for the hyperlink.
Here’s why option B is correct:
Requirement Analysis: The requirement specifies showing a hyperlink for positions " not available for hiring. " In the provided XML, the ps:Available_For_Hire field under ps:Position_Data indicates whether a position is available for hire (e.g., < ps:Available_For_Hire > true < /ps:Available_For_Hire > ). For positions where this is false, you need to create a message (hyperlink) in the Message tab, which typically requires linking to a Workday ID (WID) or other identifier.
ETV Attributes:
etv:required= " true " : This ensures that the ps:WID value under ps:Additional_Information is mandatory for the transformation. If the WID is missing, the transformation will fail or generate an error, ensuring that the hyperlink can be created only for valid positions with an associated WID.
etv:target= " [ps:Additional_Information/ps:WID] " : This specifies that the target of the transformation (e.g., the hyperlink) should be the WID value found at ps:Additional_Information/ps:WID in the XML. This WID can be used to construct a hyperlink to the position in Workday, meeting the requirement to show a hyperlink for positions not available for hiring.
Context in XML: The XML shows ps:Additional_Information containing ps:WID (e.g., < ps:WID > 73bd4d8562e04b1820f55818467905b < /ps:WID > ), which is a unique identifier for the position. By targeting this WID with etv:target, you ensure the hyperlink points to the correct position record in Workday when ps:Available_For_Hire is false.
Why not the other options?
A.
etv:minLength= " 0 "
etv:targetWID= " [ps:Additional_Information/ps:WID] "
etv:minLength= " 0 " allows the WID to be empty or have zero length, which contradicts the need for a valid WID to create a hyperlink. It does not ensure the data is present, making it unsuitable. Additionally, etv:targetWID is not a standard ETV attribute; the correct attribute is etv:target, making this option incorrect.
C.
etv:minLength= " 0 "
etv:target= " [ps:Additional_Information/ps:WID] "
Similar to option A, etv:minLength= " 0 " allows the WID to be empty, which does not meet the requirement for a mandatory WID to create a hyperlink. This makes it incorrect, as the hyperlink would fail if the WID is missing.
D.
etv:required= " true "
etv:targetWID= " [ps:Additional_Information/ps:WID] "
While etv:required= " true " ensures the WID is present, etv:targetWID is not a standard ETV attribute. The correct attribute is etv:target, making this option syntactically incorrect and unsuitable for the transformation.
To implement this in XSLT for a Workday integration:
Use the ETV attributes from option B (etv:required= " true " and etv:target= " [ps:Additional_Information/ps:WID] " ) within your XSLT template to validate and target the ps:WID for positions where ps:Available_For_Hire is false. This ensures the transformation generates a valid hyperlink in the Message tab, linking to the position’s WID in Workday.
Workday Pro Integrations Study Guide: Section on " ETV in XSLT Transformations " – Details the use of ETV attributes like required and target for validating and targeting data in Workday XML, including handling identifiers like WID for hyperlinks.
Workday Core Connector and EIB Guide: Chapter on " XML Transformations " – Explains how to use ETV attributes in XSLT to process position data, including creating messages or hyperlinks based on conditions like Available_For_Hire.
Workday Integration System Fundamentals: Section on " ETV for Message Generation " – Covers applying ETV attributes to generate hyperlinks in the Message tab, ensuring data integrity and correct targeting of Workday identifiers like WID.
Refer to the following XML to answer the question below.
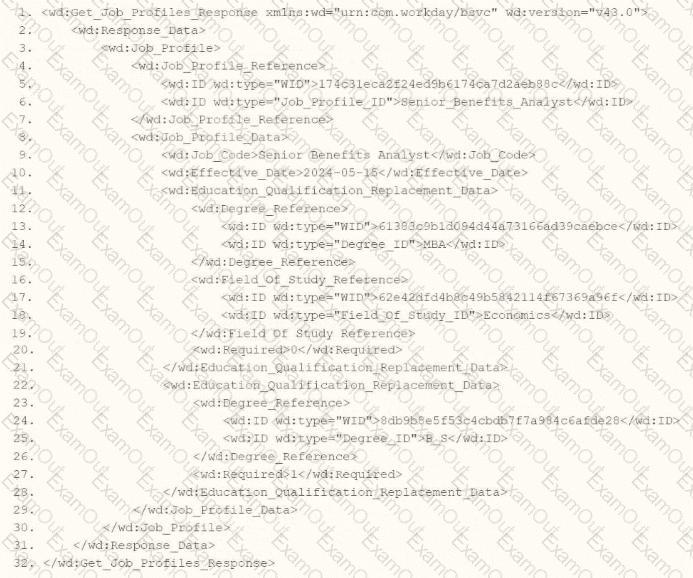
You are an integration developer and need to write XSLT to transform the output of an EIB which is making a request to the Get Job Profiles web service operation. The root template of your XSLT matches on the < wd:Get_Job_Profiles_Response > element. This root template then applies templates against < wd:Job_Profile > . What XPath syntax would be used to select the value of the ID element which has a wd:type attribute named Job_Profile_ID when the < xsl:value-of > element is placed within the template which matches on < wd:Job_Profile > ?
wd:Job_Profile_Reference/wd:ID/wd:type= ' Job_Profile_ID '
wd:Job_Profile_Reference/wd:ID/@wd:type= ' Job_Profile_ID '
wd:Job_Profile_Reference/wd:ID[@wd:type= ' Job_Profile_ID ' ]
wd:Job_Profile_Reference/wd:ID/[@wd:type= ' Job_Profile_ID ' ]
The Answer Is:
CExplanation:
As an integration developer working with Workday, you are tasked with transforming the output of an Enterprise Interface Builder (EIB) that calls the Get_Job_Profiles web service operation. The provided XML shows the response from this operation, and you need to write XSLT to select the value of the < wd:ID > element where the wd:type attribute equals " Job_Profile_ID. " The root template of your XSLT matches on < wd:Get_Job_Profiles_Response > and applies templates to < wd:Job_Profile > . Within this template, you use the < xsl:value-of > element to extract the value. Let’s analyze the XML structure, the requirement, and each option to determine the correct XPath syntax.
Understanding the XML and Requirement
The XML snippet provided is a SOAP response from the Get_Job_Profiles web service operation in Workday, using the namespace xmlns:wd= " urn:com.workday/bsvc " and version wd:version= " v43.0 " . Key elements relevant to the question include:
The root element is < wd:Get_Job_Profiles_Response > .
It contains < wd:Response_Data > , which includes < wd:Job_Profile > elements.
Within < wd:Job_Profile > , there is < wd:Job_Profile_Reference > , which contains multiple < wd:ID > elements, each with a wd:type attribute:
< wd:ID wd:type= " WID " > 1740d3eca2f2ed9b6174ca7d2ae88c8c < /wd:ID >
< wd:ID wd:type= " Job_Profile_ID " > Senior_Benefits_Analyst < /wd:ID >
The task is to select the value of the < wd:ID > element where wd:type= " Job_Profile_ID " (e.g., " Senior_Benefits_Analyst " ) using XPath within an XSLT template that matches < wd:Job_Profile > . The < xsl:value-of > element outputs the value of the selected node, so you need the correct XPath path from the < wd:Job_Profile > context to the specific < wd:ID > element with the wd:type attribute value " Job_Profile_ID. "
Analysis of Options
Let’s evaluate each option based on the XML structure and XPath syntax rules:
Option A: wd:Job_Profile_Reference/wd:ID/wd:type= ' Job_Profile_ID '
This XPath attempts to navigate from wd:Job_Profile_Reference to wd:ID, then to wd:type= ' Job_Profile_ID ' . However, there are several issues:
wd:type= ' Job_Profile_ID ' is not valid XPath syntax. In XPath, to filter based on an attribute value, you use the attribute selector [@attribute= ' value ' ], not a direct comparison like wd:type= ' Job_Profile_ID ' .
wd:type is an attribute of < wd:ID > , not a child element or node. This syntax would not select the < wd:ID > element itself but would be interpreted as trying to match a nonexistent child node or property, resulting in an error or no match.
This option is incorrect because it misuses XPath syntax for attribute filtering.
Option B: wd:Job_Profile_Reference/wd:ID/@wd:type= ' Job_Profile_ID '
This XPath navigates to wd:Job_Profile_Reference/wd:ID and then selects the @wd:type attribute, comparing it to " Job_Profile_ID " with =@wd:type= ' Job_Profile_ID ' . However:
The =@wd:type= ' Job_Profile_ID ' syntax is invalid in XPath. To filter based on an attribute value, you use [@wd:type= ' Job_Profile_ID ' ] as a predicate, not an equality comparison in this form.
This XPath would select the wd:type attribute itself (e.g., the string " Job_Profile_ID " ), not the value of the < wd:ID > element. Since < xsl:value-of > expects a node or element value, selecting an attribute directly would not yield the desired " Senior_Benefits_Analyst " value.
This option is incorrect due to the invalid syntax and inappropriate selection of the attribute instead of the element value.
Option C: wd:Job_Profile_Reference/wd:ID[@wd:type= ' Job_Profile_ID ' ]
This XPath navigates from wd:Job_Profile_Reference to wd:ID and uses the predicate [@wd:type= ' Job_Profile_ID ' ] to filter for < wd:ID > elements where the wd:type attribute equals " Job_Profile_ID. "
In the XML, < wd:Job_Profile_Reference > contains:
< wd:ID wd:type= " WID " > 1740d3eca2f2ed9b6174ca7d2ae88c8c < /wd:ID >
< wd:ID wd:type= " Job_Profile_ID " > Senior_Benefits_Analyst < /wd:ID >
The predicate [@wd:type= ' Job_Profile_ID ' ] selects the second < wd:ID > element, whose value is " Senior_Benefits_Analyst. "
Since the template matches < wd:Job_Profile > , and < wd:Job_Profile_Reference > is a direct child of < wd:Job_Profile > , this path is correct:
< wd:Job_Profile > → < wd:Job_Profile_Reference > → < wd:ID[@wd:type= ' Job_Profile_ID ' ] > .
When used with < xsl:value-of select= " wd:Job_Profile_Reference/wd:ID[@wd:type= ' Job_Profile_ID ' ] " / > , it outputs " Senior_Benefits_Analyst, " fulfilling the requirement.
This option is correct because it uses proper XPath syntax for attribute-based filtering and selects the desired < wd:ID > value.
Option D: wd:Job_Profile_Reference/wd:ID/[@wd:type= ' Job_Profile_ID ' ]
This XPath is similar to Option C but includes an extra forward slash before the predicate: wd:ID/[@wd:type= ' Job_Profile_ID ' ]. In XPath, predicates like [@attribute= ' value ' ] are used directly after the node name (e.g., wd:ID[@wd:type= ' Job_Profile_ID ' ]), not separated by a slash. The extra slash is syntactically incorrect and would result in an error or no match, as it implies navigating to a child node that doesn’t exist.
This option is incorrect due to the invalid syntax.
Why Option C is Correct
Option C, wd:Job_Profile_Reference/wd:ID[@wd:type= ' Job_Profile_ID ' ], is the correct XPath syntax because:
It starts from the context node < wd:Job_Profile > (as the template matches this element) and navigates to < wd:Job_Profile_Reference/wd:ID > , using the predicate [@wd:type= ' Job_Profile_ID ' ] to filter for the < wd:ID > element with wd:type= " Job_Profile_ID " .
It correctly selects the value " Senior_Benefits_Analyst, " which is the content of the < wd:ID > element where wd:type= " Job_Profile_ID " .
It uses standard XPath syntax for attribute-based filtering, aligning with Workday’s XSLT implementation for web service responses.
When used with < xsl:value-of > , it outputs the required value, fulfilling the question’s requirement.
Practical Example in XSLT
Here’s how this might look in your XSLT:
< xsl:template match= " wd:Job_Profile " >
< xsl:value-of select= " wd:Job_Profile_Reference/wd:ID[@wd:type= ' Job_Profile_ID ' ] " / >
< /xsl:template >
This would output " Senior_Benefits_Analyst " for the < wd:ID > element with wd:type= " Job_Profile_ID " in the XML.
Verification with Workday Documentation
The Workday Pro Integrations Study Guide and SOAP API Reference (available via Workday Community) detail the structure of the Get_Job_Profiles response and how to use XPath in XSLT for transformations. The XML structure shows < wd:Job_Profile_Reference > containing < wd:ID > elements with wd:type attributes, and the guide emphasizes using predicates like [@wd:type= ' value ' ] to filter based on attributes. This is a standard practice for navigating Workday web service responses.
Workday Pro Integrations Study Guide References
Section: XSLT Transformations in EIBs – Describes using XSLT to transform web service responses, including selecting elements with XPath and attribute predicates.
Section: Workday Web Services – Details the Get_Job_Profiles operation and its XML output structure, including < wd:Job_Profile_Reference > and < wd:ID > with wd:type attributes.
Section: XPath Syntax – Explains how to use predicates like [@wd:type= ' Job_Profile_ID ' ] for attribute-based filtering in Workday XSLT.
Workday Community SOAP API Reference – Provides examples of XPath navigation for Workday web service responses, including attribute selection.
Option C is the verified answer, as it correctly selects the < wd:ID > value with wd:type= " Job_Profile_ID " using the appropriate XPath syntax within the < wd:Job_Profile > template context.
What is the purpose of granting an ISU modify access to the Integration Event domain via an ISSG?
To have the ISU own the integration schedule.
To let the ISU configure integration attributes and maps.
To log into the user interface as the ISU and launch the integration.
To build the integration system as the ISU.
The Answer Is:
BExplanation:
Understanding ISUs and Integration Systems in Workday
Integration System User (ISU): An ISU is a specialized user account in Workday designed for integrations, functioning as a service account to authenticate and execute integration processes. ISUs are created using the " Create Integration System User " task and are typically configured with settings like disabling UI sessions and setting long session timeouts (e.g., 0 minutes) to prevent expiration during automated processes. ISUs are not human users but are instead programmatic accounts used for API calls, EIBs, Core Connectors, or other integration mechanisms.
Integration Systems: In Workday, an " integration system " refers to the configuration or setup of an integration, such as an External Integration Business (EIB), Core Connector, or custom integration via web services. Integration systems are defined to handle data exchange between Workday and external systems, and they require authentication, often via an ISU, to execute tasks like data retrieval, transformation, or posting.
Assigning ISUs to Integration Systems: ISUs are used to authenticate and authorize integration systems to interact with Workday. When configuring an integration system, you assign an ISU to provide the credentials needed for the integration to run. This assignment ensures that the integration can access Workday data and functionalities based on the security permissions granted to the ISU via its associated Integration System Security Group (ISSG).
Limitation on Assignment: Workday’s security model imposes restrictions to maintain control and auditability. Specifically, an ISU is designed to be tied to a single integration system to ensure clear accountability, prevent conflicts, and simplify security management. This limitation prevents an ISU from being reused across multiple unrelated integration systems, reducing the risk of unintended access or data leakage.
Evaluating Each Option
Let’s assess each option based on Workday’s integration and security practices:
Option A: An ISU can be assigned to five integration systems.
Analysis: This is incorrect. Workday does not impose a specific numerical limit like " five " for ISU assignments to integration systems. Instead, the limitation is more restrictive: an ISU is typically assigned to only one integration system to ensure focused security and accountability. Allowing an ISU to serve multiple systems could lead to confusion, overlapping permissions, or security risks, which Workday’s design avoids.
Why It Doesn’t Fit: There’s no documentation or standard practice in Workday Pro Integrations suggesting a limit of five integration systems per ISU. This option is arbitrary and inconsistent with Workday’s security model.
Option B: An ISU can be assigned to an unlimited number of integration systems.
Analysis: This is incorrect. Workday’s security best practices do not allow an ISU to be assigned to an unlimited number of integration systems. Allowing this would create security vulnerabilities, as an ISU’s permissions (via its ISSG) could be applied across multiple unrelated systems, potentially leading to unauthorized access or data conflicts. Workday enforces a one-to-one or tightly controlled relationship to maintain auditability and security.
Why It Doesn’t Fit: The principle of least privilege and clear accountability in Workday integrations requires limiting an ISU’s scope, not allowing unlimited assignments.
Option C: An ISU can be assigned to only one integration system.
Analysis: This is correct. In Workday, an ISU is typically assigned to a single integration system to ensure that its credentials and permissions are tightly scoped. This aligns with Workday’s security model, where ISUs are created for specific integration purposes (e.g., an EIB, Core Connector, or web service integration). When configuring an integration system, you specify the ISU in the integration setup (e.g., under " Integration System Attributes " or " Authentication " settings), and it is not reused across multiple systems to prevent conflicts or unintended access. This limitation ensures traceability and security, as the ISU’s actions can be audited within the context of that single integration.
Why It Fits: Workday documentation and best practices, including training materials and community forums, emphasize that ISUs are dedicated to specific integrations. For example, when creating an EIB or Core Connector, you assign an ISU, and it is not shared across other integrations unless explicitly reconfigured, which is rare and discouraged for security reasons.
Option D: An ISU can only be assigned to an ISSG and not an integration system.
Analysis: This is incorrect. While ISUs are indeed assigned to ISSGs to inherit security permissions (as established in Question 26), they are also assigned to integration systems to provide authentication and authorization for executing integration tasks. The ISU’s role includes both: it belongs to an ISSG for permissions and is linked to an integration system for execution. Saying it can only be assigned to an ISSG and not an integration system misrepresents Workday’s design, as ISUs are explicitly configured in integration systems (e.g., EIB, Core Connector) to run processes.
Why It Doesn’t Fit: ISUs are integral to integration systems, providing credentials for API calls or data exchange. Excluding assignment to integration systems contradicts Workday’s integration framework.
Final Verification
The correct answer is Option C, as Workday limits an ISU to a single integration system to ensure security, accountability, and clarity in integration operations. This aligns with the principle of least privilege, where ISUs are scoped narrowly to avoid overexposure. For example, when setting up a Core Connector: Job Postings (as in Question 25), you assign an ISU specifically for that integration, not multiple ones, unless reconfiguring for a different purpose, which is atypical.
Supporting Documentation
The reasoning is based on Workday Pro Integrations security practices, including:
Workday Community documentation on creating and managing ISUs and integration systems.
Tutorials on configuring EIBs, Core Connectors, and web services, which show assigning ISUs to specific integrations (e.g., Workday Advanced Studio Tutorial).
Integration security overviews from implementation partners (e.g., NetIQ, Microsoft Learn, Reco.ai) emphasizing one ISU per integration for security.
Community discussions on Reddit and Workday forums reinforcing that ISUs are tied to single integrations for auditability (r/workday on Reddit).
This question focuses on the purpose of granting an Integration System User (ISU) modify access to the Integration Event domain via an Integration System Security Group (ISSG) in Workday Pro Integrations. Let’s analyze the role of the ISU, the Integration Event domain, and evaluate each option to determine the correct answer.
Understanding ISUs, ISSGs, and the Integration Event Domain
Integration System User (ISU): As described in previous questions, an ISU is a service account for integrations, used to authenticate and execute integration processes in Workday. ISUs are assigned to ISSGs to inherit security permissions and are linked to specific integration systems (e.g., EIBs, Core Connectors) for execution.
Integration System Security Group (ISSG): An ISSG is a security group that defines the permissions for ISUs, controlling what data and functionalities they can access or modify. ISSGs can be unconstrained (access all instances) or constrained (access specific instances based on context). Permissions are granted via domain security policies, such as " Get, " " Put, " " View, " or " Modify, " applied to Workday domains.
Integration Event Domain: In Workday, the Integration Event domain (or Integration Events security domain) governs access to integration-related activities, such as managing integration events, schedules, attributes, mappings, and logs. This domain is critical for integrations, as it controls the ability to create, modify, or view integration configurations and runtime events.
" Modify " access to the Integration Event domain allows the ISU to make changes to integration configurations, such as attributes (e.g., file names, endpoints), mappings (e.g., data transformations), and event settings (e.g., schedules or triggers).
This domain does not typically grant UI access or ownership of schedules but focuses on configuration and runtime control.
Purpose of Granting Modify Access: Granting an ISU modify access to the Integration Event domain via an ISSG enables the ISU to perform configuration tasks for integrations, ensuring the integration system can adapt or update its settings programmatically. This is essential for automated integrations that need to adjust mappings, attributes, or event triggers without manual intervention. However, ISUs are not designed for UI interaction or administrative ownership, as they are service accounts.
Evaluating Each Option
Let’s assess each option based on Workday’s security and integration model:
Option A: To have the ISU own the integration schedule.
Analysis: This is incorrect. ISUs do not " own " integration schedules or any other integration components. Ownership is not a concept applicable to ISUs, which are service accounts for execution, not administrative entities. Integration schedules are configured within the integration system (e.g., EIB or Core Connector) and managed by administrators or users with appropriate security roles, not by ISUs. Modify access to the Integration Event domain allows changes to schedules, but it doesn’t imply ownership.
Why It Doesn’t Fit: ISUs lack administrative control or ownership; they execute based on permissions, not manage schedules as owners. This misinterprets the ISU’s role.
Option B: To let the ISU configure integration attributes and maps.
Analysis: This is correct. Granting modify access to the Integration Event domain allows the ISU to alter integration configurations, including attributes (e.g., file names, endpoints, timeouts) and mappings (e.g., data transformations like worker subtype mappings from Question 25). The Integration Event domain governs these configuration elements, and " Modify " permission enables the ISU to update them programmatically during integration execution. This is a standard use case for ISUs in automated integrations, ensuring flexibility without manual intervention.
Why It Fits: Workday’s documentation and training materials indicate that the Integration Event domain controls integration configuration tasks. For example, in an EIB or Core Connector, an ISU with modify access can adjust mappings or attributes, as seen in tutorials on integration setup (Workday Advanced Studio Tutorial). This aligns with the ISU’s role as a service account for dynamic configuration.
Option C: To log into the user interface as the ISU and launch the integration.
Analysis: This is incorrect. ISUs are not intended for UI interaction. When creating an ISU, a best practice is to disable UI sessions (e.g., set " Allow UI Sessions " to " No " ) and configure a session timeout of 0 minutes to prevent expiration during automation. ISUs operate programmatically via APIs or integration systems, not through the Workday UI. Modify access to the Integration Event domain enables configuration changes, not UI login or manual launching.
Why It Doesn’t Fit: Logging into the UI contradicts ISU design, as they are service accounts, not user accounts. This option misrepresents their purpose.
Option D: To build the integration system as the ISU.
Analysis: This is incorrect. ISUs do not " build " integration systems; they execute or configure existing integrations based on permissions. Building an integration system (e.g., creating EIBs, Core Connectors, or web services) is an administrative task performed by users with appropriate security roles (e.g., Integration Build domain access), not ISUs. Modify access to the Integration Event domain allows configuration changes, not the creation or design of integration systems.
Why It Doesn’t Fit: ISUs lack the authority or capability to build integrations; they are for runtime execution and configuration, not development or design.
Final Verification
The correct answer is Option B, as granting an ISU modify access to the Integration Event domain via an ISSG enables it to configure integration attributes (e.g., file names, endpoints) and maps (e.g., data transformations), which are critical for dynamic integration operations. This aligns with Workday’s security model, where ISUs handle automated tasks within defined permissions, not UI interaction, ownership, or system building.
For example, in the Core Connector: Job Postings from Question 25, an ISU with modify access to Integration Event could update the filename pattern or worker subtype mappings, ensuring the integration adapts to vendor requirements without manual intervention. This is consistent with Workday’s design for integration automation.
Supporting Documentation
The reasoning is based on Workday Pro Integrations security practices, including:
Workday Community documentation on ISUs, ISSGs, and domain security (e.g., Integration Event domain permissions).
Tutorials on configuring EIBs and Core Connectors, showing ISUs modifying attributes and mappings (Workday Advanced Studio Tutorial).
Integration security overviews from implementation partners (e.g., NetIQ, Microsoft Learn, Reco.ai) detailing domain access for ISUs.
Community discussions on Reddit and Workday forums reinforcing ISU roles for configuration, not UI or ownership (r/workday on Reddit).
You are creating a report that needs a data source of All Active and Terminated Workers. However, when searching for that data source it is not showing in the prompt field.
Why is All Active and Terminated Workers not showing as an option?
Optimized for Performance is checked.
The incorrect report type is selected.
The report is enabled as a temporary report.
Enabled as a Web Service is checked.
The Answer Is:
BExplanation:
In Workday Report Writer, the available data sources depend heavily on the selected report type and the reporting context. If the required data source, such as All Active and Terminated Workers, does not appear in the prompt, the most likely cause is that the wrong report type has been selected during report creation. Workday filters the available data sources based on compatibility with the selected report type. Enabling a report as a web service does not remove data sources from the prompt, and temporary report settings do not determine whether this worker data source appears. Optimized for Performance affects report execution and performance behavior, not whether the core data source is selectable. Correcting the report type allows the proper worker data source to appear.
================
When creating an XSLT file to transform the XML output of an EIB, you must have the XSL namespace. What other namespace(s) do you need to process any part of the source XML file?
The most commonly used namespace of the source XML document.
All namespaces that are a part of the source XML document.
Either the ETV or XTT namespace based on the type of output file desired.
No namespaces from the source XML document are needed.
The Answer Is:
BExplanation:
When writing XSLT to transform an XML document, you must declare and reference all XML namespaces used in the source XML.
“To accurately access and transform nodes using XPath, every namespace in the source document must be declared in the XSLT stylesheet.”
This ensures that XPath expressions correctly match the fully qualified elements, especially when multiple namespaces are in use.
Why the others are incorrect:
A (most commonly used) would be incomplete.
C (ETV/XTT) are specific Workday terminologies but don ' t replace namespace declarations.
D is incorrect; namespaces are required to avoid XPath resolution failures.
Refer to the following scenario to answer the question below.
You need to configure a Core Connector: Candidate Outbound integration for your vendor. The connector requires the data initialization service (DIS).
The vendor needs a value on the output file which contains the average number of jobs a candidate applied to. This value is not delivered by Workday so you have identified that you will need to build a calculated field to generate this value.
What steps do you follow to output the calculated field?
Configure a custom field override service to output the calculation.
Configure integration attributes to output the calculation.
Configure integration field attributes to output the calculation.
Configure integration field overrides to output the calculation.
The Answer Is:
DExplanation:
The scenario involves a Core Connector: Candidate Outbound integration requiring a calculated field for the average number of jobs a candidate applied to, which isn’t a delivered Workday field. The task is to output this calculated field in the integration file. Core Connectors in Workday use predefined templates but allow customization through various configuration options. Let’s evaluate the steps:
Context:
Core Connector: Candidate Outbound uses the Data Initialization Service (DIS) to extract candidate data.
A calculated field must be created (e.g., averaging the " Number of Job Applications " field across a candidate’s records).
This value needs to be included in the output file sent to the vendor.
Integration Field Overrides:In Core Connectors, calculated fields are typically incorporated into the output by defining integration field overrides. This feature allows you to map a calculated field to a specific field in the connector’s output structure, overriding the default delivered value (or adding a new field). The calculated field is built separately (e.g., in Report Writer or Calculated Fields) and then referenced in the integration configuration.
Option Analysis:
A. Configure a custom field override service to output the calculation: Incorrect. There’s no " custom field override service " in Workday Core Connectors. This might confuse with integration field overrides, but it’s not a distinct service.
B. Configure integration attributes to output the calculation: Incorrect. Integration attributes define metadata or settings for the integration (e.g., file name, delivery method), not specific field mappings for output data.
C. Configure integration field attributes to output the calculation: Incorrect. " Integration field attributes " isn’t a precise Workday term for this purpose; it may confuse with field-level settings, but field overrides are the correct mechanism.
D. Configure integration field overrides to output the calculation: Correct. This is the standard method in Core Connectors to include calculated fields in the output file by overriding or adding to the delivered field structure.
Implementation:
Create a calculated field (e.g., " Average Job Applications " ) using functions like Arithmetic Calculation to average job application counts.
In the Core Connector configuration, navigate to the Integration Field Overrides section.
Define a new field or override an existing one, mapping it to the calculated field.
Test the integration to ensure the calculated value appears in the output file.
References from Workday Pro Integrations Study Guide:
Core Connectors & Document Transformation: Section on " Configuring Integration Field Overrides " explains mapping calculated fields to output files.
Integration System Fundamentals: Details how Core Connectors extend delivered functionality with custom calculations.
Which three features must all XSLT files contain to be considered valid?
A root element, namespace, and at least one transformation
A root element, namespace, and at least one template
A header, a footer, and a namespace
A template, a prefix, and a header
The Answer Is:
BExplanation:
For an XSLT (Extensible Stylesheet Language Transformations) file to be considered valid in the context of Workday integrations (and per general XSLT standards), it must adhere to specific structural and functional requirements. The correct answer is that an XSLT file must contain a root element, a namespace, and at least one template. Below is a detailed explanation of why this is the case, grounded in Workday’s integration practices and XSLT specifications:
Root Element:
Every valid XSLT file must have a single root element, which serves as the top-level container for the stylesheet. In XSLT, this is typically the < xsl:stylesheet > or < xsl:transform > element (both are interchangeable, though < xsl:stylesheet > is more common).
The root element defines the structure of the XSLT document and encapsulates all other elements, such as templates and namespaces. Without a root element, the file would not conform to XML well-formedness rules, which are a prerequisite for XSLT validity.
Example:
< xsl:stylesheet version= " 1.0 " xmlns:xsl= " http://www.w3.org/1999/XSL/Transform " >
< /xsl:stylesheet >
Namespace:
An XSLT file must declare the XSLT namespace, typically http://www.w3.org/1999/XSL/Transform, to identify it as an XSLT stylesheet and enable the processor to recognize XSLT-specific elements (e.g., < xsl:template > , < xsl:value-of > ). This is declared within the root element using the xmlns:xsl attribute.
The namespace ensures that the elements used in the stylesheet are interpreted as XSLT instructions rather than arbitrary XML. Without this namespace, the file would not function as an XSLT stylesheet, as the processor would not know how to process its contents.
In Workday’s Document Transformation integrations, additional namespaces (e.g., for Workday-specific schemas) may also be included, but the XSLT namespace is mandatory for validity.
At Least One Template:
An XSLT file must contain at least one < xsl:template > element to define the transformation logic. Templates are the core mechanism by which XSLT processes input XML and produces output. They specify rules for matching nodes in the source XML (via the match attribute) and generating the transformed result.
Without at least one template, the stylesheet would lack any transformation capability, rendering it functionally invalid for its intended purpose. Even a minimal XSLT file requires a template to produce meaningful output, though built-in default templates exist, they are insufficient for custom transformations like those used in Workday.
Example:
< xsl:template match= " / " >
< result > Hello, Workday! < /result >
< /xsl:template >
Complete Minimal Valid XSLT Example:
< xsl:stylesheet version= " 1.0 " xmlns:xsl= " http://www.w3.org/1999/XSL/Transform " >
< xsl:template match= " / " >
< output > Transformed Data < /output >
< /xsl:template >
< /xsl:stylesheet >
Why Other Options Are Incorrect:
A. A root element, namespace, and at least one transformation: While this is close, " transformation " is not a precise term in XSLT. The correct requirement is a " template, " which defines the transformation logic. " Transformation " might imply the overall process, but the specific feature required in the file is a template.
C. A header, a footer, and a namespace: XSLT files do not require a " header " or " footer. " These terms are not part of XSLT or XML standards. The structure is defined by the root element and templates, not headers or footers, making this option invalid.
D. A template, a prefix, and a header: While a template is required, " prefix " (likely referring to the namespace prefix like xsl:) is not a standalone feature—it’s part of the namespace declaration within the root element. " Header " is not a required component, making this option incorrect.
Workday Context:
In Workday’s Document Transformation systems (e.g., Core Connectors or custom integrations), XSLT files are uploaded as attachment transformations. Workday enforces these requirements to ensure the stylesheets can process XML data (e.g., from Workday reports or connectors) into formats suitable for external systems. The Workday platform validates these components when an XSLT file is uploaded, rejecting files that lack a root element, namespace, or functional templates.
Workday Pro Integrations Study Guide References:
Workday Integration System Fundamentals: Describes the structure of XSLT files, emphasizing the need for a root element ( < xsl:stylesheet > ), the XSLT namespace, and templates as the building blocks of transformation logic.
Document Transformation Module: Details the requirements for uploading valid XSLT files in Workday, including examples that consistently feature a root element, namespace declaration, and at least one template (e.g., " XSLT Basics for Document Transformation " ).
Core Connectors and Document Transformation Course Manual: Provides sample XSLT files used in labs, all of which include these three components to ensure functionality within Workday integrations.
Workday Community Documentation: Reinforces that XSLT files must be well-formed XML with an XSLT namespace and at least one template to be processed correctly by Workday’s integration engine.
Refer to the following scenario to answer the question below. You have configured a Core Connector: Worker integration, which utilizes the following basic configuration:
• Integration field attributes are configured to output the Position Title and Business Title fields from the Position Data section.
• Integration Population Eligibility uses the field Is Manager which returns true if the worker holds a manager role.
• Transaction Log service has been configured to Subscribe to specific Transaction Types: Position Edit Event. You launch your integration with the following date launch parameters (Date format of MM/DD/YYYY):
• As of Entry Moment: 05/25/2024 12:00:00 AM
• Effective Date: 05/25/2024
• Last Successful As of Entry Moment: 05/23/2024 12:00:00 AM
• Last Successful Effective Date: 05/23/2024
To test your integration, you made a change to a worker named Jared Ellis who is assigned to the manager role for the IT Help Desk department. You perform an Edit Position on Jared and update their business title to a new value. Jared Ellis ' worker history shows the Edit Position Event as being successfully completed with an effective date of 05/27/2024 and an Entry Moment of 05/24/2024 07:58:53 AM however Jared Ellis does not show up in your output. What configuration element would have to be modified for the integration to include Jared Ellis in the output?
Integration Population Eligibility
Date launch parameters
Integration Field Attributes
Transaction log subscription
The Answer Is:
BExplanation:
The scenario describes a Core Connector: Worker integration configured to output Position Title and Business Title fields for workers who meet the Integration Population Eligibility criteria (Is Manager = true), with the Transaction Log service subscribed to the " Position Edit Event. " The integration is launched with specific date parameters, and a test is performed by updating Jared Ellis’ Business Title via an " Edit Position " action. Jared is a manager, and the change is logged with an effective date of 05/27/2024 and an entry moment of 05/24/2024 07:58:53 AM. Despite this, Jared does not appear in the output. Let’s analyze why and determine the configuration element that needs modification.
In Workday, the Core Connector: Worker integration relies on the Transaction Log service to detect changes based on subscribed transaction types and processes them according to the date launch parameters. The integration is configured as an incremental run (since " Last Successful " parameters are provided), meaning it captures changes that occurred since the last successful run, within the specified date ranges. The date launch parameters are:
As of Entry Moment: 05/25/2024 12:00:00 AM – The latest point for when changes were entered into the system.
Effective Date: 05/25/2024 – The latest effective date for changes to be considered.
Last Successful As of Entry Moment: 05/23/2024 12:00:00 AM – The starting point for entry moments from the last run.
Last Successful Effective Date: 05/23/2024 – The starting point for effective dates from the last run.
For an incremental run, Workday processes changes where:
The Entry Moment falls between the Last Successful As of Entry Moment (05/23/2024 12:00:00 AM) and the As of Entry Moment (05/25/2024 12:00:00 AM), and
The Effective Date falls between the Last Successful Effective Date (05/23/2024) and the Effective Date (05/25/2024).
Now, let’s evaluate Jared Ellis’ change:
Entry Moment: 05/24/2024 07:58:53 AM – This falls within the range of 05/23/2024 12:00:00 AM to 05/25/2024 12:00:00 AM, so the entry timing is captured correctly.
Effective Date: 05/27/2024 – This is after the Effective Date of 05/25/2024 specified in the launch parameters.
The issue arises with the Effective Date. The integration only processes changes with an effective date between 05/23/2024 (Last Successful Effective Date) and 05/25/2024 (Effective Date). Jared’s change, with an effective date of 05/27/2024, falls outside this range. In Workday, the effective date determines when a change takes effect, and incremental integrations rely on this date to filter relevant transactions. Even though the entry moment (when the change was entered) is within the specified window, the effective date being in the future (relative to the integration’s Effective Date of 05/25/2024) excludes Jared from the output.
To include Jared Ellis in the output, the Date launch parameters must be modified. Specifically, the Effective Date needs to be adjusted to a date that includes 05/27/2024 (e.g., 05/27/2024 or later). This ensures the integration captures changes effective up to or beyond Jared’s edit. Alternatively, if the intent is to process future-dated changes entered within the current window, the integration could be adjusted to consider the entry moment as the primary filter, though this would typically require a different configuration approach (e.g., full file mode or a custom report, not standard incremental behavior).
Let’s evaluate the other options:
A. Integration Population Eligibility: Set to " Is Manager = true, " and Jared is a manager. This filter is correct and does not need modification.
C. Integration Field Attributes: Configured to output Position Title and Business Title, and the change to Business Title is within scope. The field configuration is appropriate.
D. Transaction log subscription: Subscribed to " Position Edit Event, " which matches the " Edit Position " action performed on Jared. The subscription type is correct.
The mismatch between the integration’s Effective Date (05/25/2024) and Jared’s change effective date (05/27/2024) is the reason for exclusion, making B. Date launch parameters the correct answer.
Workday Pro Integrations Study Guide References
Workday Integrations Study Guide: Core Connector: Worker – Section on " Change Detection " explains how effective dates and entry moments govern incremental processing.
Workday Integrations Study Guide: Launch Parameters – Details the roles of " Effective Date " and " As of Entry Moment " in filtering changes, emphasizing that incremental runs focus on the effective date range.
Workday Integrations Study Guide: Incremental Processing – Describes how future-dated changes (effective dates beyond the launch parameter) are excluded unless the parameters are adjusted accordingly.