Yo ur network contains an Active Directory Domain Services (AD DS) domain- The domain contains 10 servers that run Windows Server. The servers have static IP addresses.
You plan to use DHCP to assign IP addresses to the servers.
You need to ensure that each s erver always receives the same IP address.
Which type of identifier should you use to create a DHCP reservation for each server?
You have an Azure virtual machine named VM1 that runs Windows Server.
You have an Azure subscription that has Microsoft Defender for Cloud enabled.
You need to ensure t hat you can use the Azure Policy guest configuration feature to manage VM1.
What should you do?
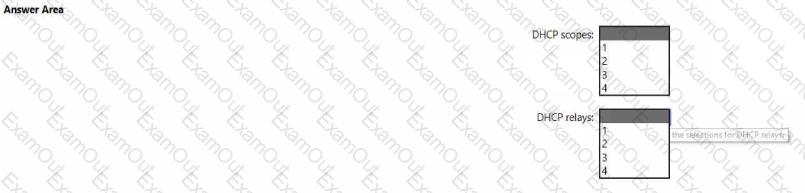
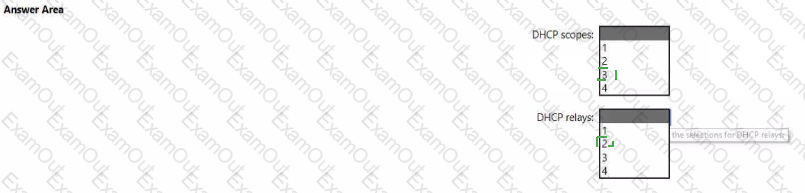
Your network contains two VLANs for client computers and one VLAN for a datacenter Each VLAN is assigned an IPv4 subnet Currently, all the client computers use static IP addresses.
You plan t o dep loy a DHCP server to the VLAN in the datacenter.
You need to use the DHCP server to provide IP configurations to all the client computers.
What is the minimum number of scopes and DHCP relays you should create? To answer, select the appropriate options in the answer area.
NOTE: Each correct selection is worth one point.
Your network contains an Active Directory Domain Services (AD DS) domain. The domain contains two servers named Server1 and Server2 and the users shown in the following table.
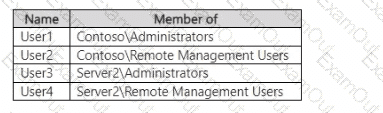
Which users can establish a PowerShell remoting session from Server1 to Server2?
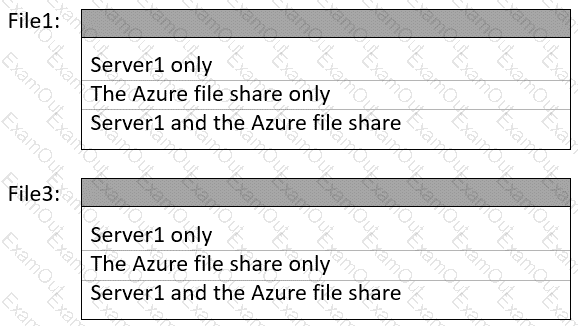
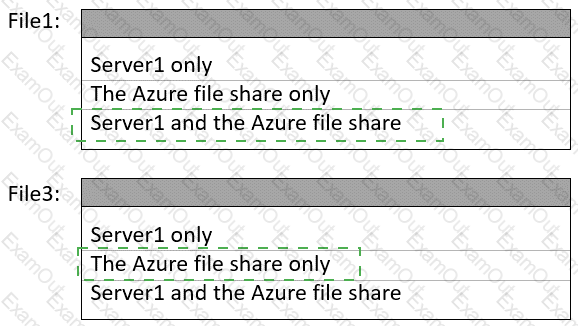
You need to sync files from an on premises server named Server1 to Azure by using Azure File Sync.
You have a cloud tiering policy that is configured for 30 percent free space and 70 days.
Volume E on Server1 is 500 GB.
A year ago, you configured E:\Data on Server1 to sync by using Azure File Sync. The files that are visible in E:\Data are sho wn in the following table.
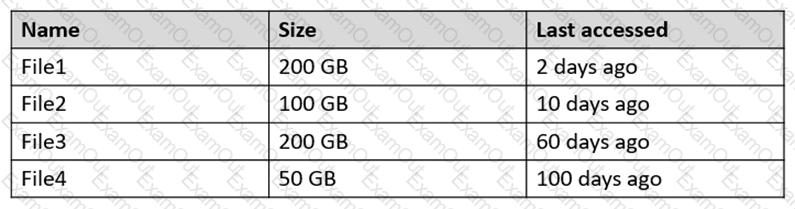
Volume E does NOT contain any other files.
Where are File1 and File3 located? To answer, select the appropriate options in the answer area.
NOTE: Each correct selection is worth one point.
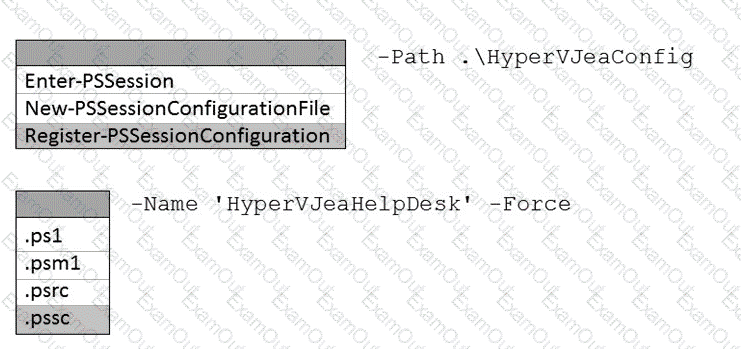
You have a server named Server1 that runs Windows Server and has the Hyper-V server role installed.
You need 10 limit which Hyper-V module cmdlets helpdesk users can use when administering Server 1 remotely.
You configure Just Enough Administration (JEA) and successfully build the role capabilities and session configuration files.
How should you complete the PowerShell command? To answer, select the appropriate options in the answer area.
NOTE: Each correct selection is worth on e point.


Your on-premises network contains an Active Directory domain named contoso.com. You have an Azure AD tenant. You plan to sync contoso.com with the Azure AD tenant by using Azure AD Connect cloud sync. You need to create an account that will be used by Azure AD Connect cloud sync. Which type of account should you create?
Your network contains an Active Directory Domain Services (AD DS) domain. The domain contains a server named Server1.
On Server 1, you install Windows Admin Center and use Windows Admin Center to remove BUILTlN\Users from the allowed groups.
Vou discover that all users can still sign in to Windows Admin Center.
Vou n eed to prevent unauthorized users from signing in to Windows Admin Center.
What should you do in Windows Admin Center?
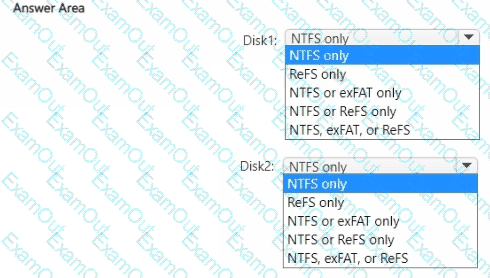
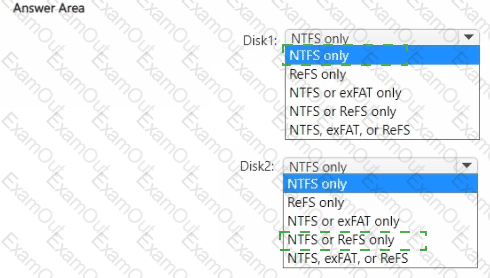
You have a Windows server named Server1.
You add two 4-TB hard drives named Disk1 and Disk2 to Server1.
You need to format the drives. The solution must meet the following requirements:
• Disk1 must support disk level quotas.
• Disk2 must support Data Deduplication.
Which type of file system should you use for each drive? To answer, select the appropriate options in the answer area.
NOTE; Each correct selection is worth one point.
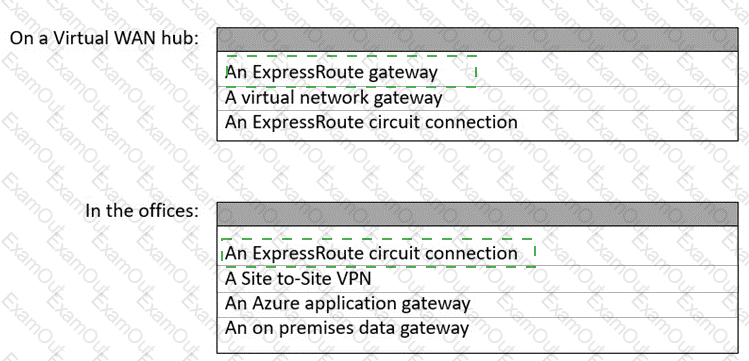
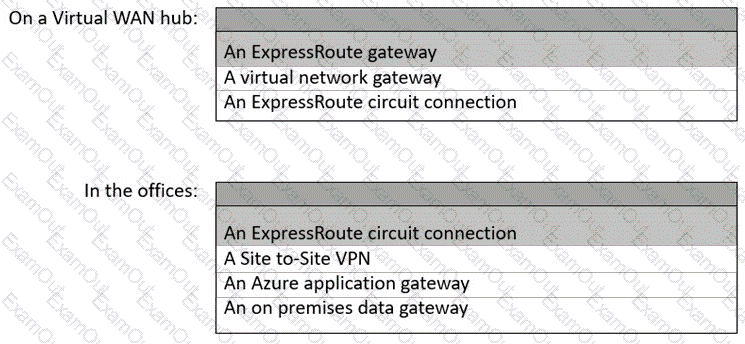
You need to configure network communication between the Seattle and New York offices. The solution must meet the networking requirements.
What should you configure? To answer, select the appropriate options in the answer area.
NOTE: Each correct sel ection is worth one point.